
A Quilt from Olga's Studio - Cutie Owl Pillow
Posted by Olga Schrichte and My Creative Stitches on 9th May 2023
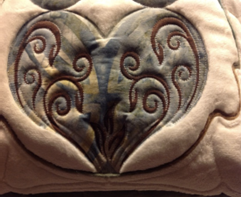
Cutie Owl Raw-Edge Appliquéd Pillow
By Olga Schrichte of Olga Quilts…
Frederick, MD
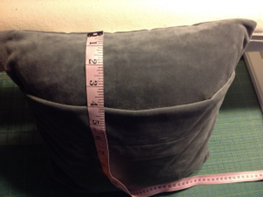
Finished Size 14” x 14”
Materials:
Christy Dillon’s Cutie Owl Panto (Cutie Owl Pantograph)
Trim Background pattern by Anita Shackelford
½ yd. cotton fabric or muslin for backing:Cut a piece 18” square
1 yd. Minkee, steel gray for background of front of pillow and back of pillow (Pay attention to the nap of the fabric.I cut mine so it felt smooth when I ran my hand from the bottom to the top.)
- Cut 15” square for front of pillow
- Cut 1 piece 15” wide x 9” high for top piece of the back pillow cover
- Cut 1 piece 15” wide x 14” high for the bottom of back of pillow cover
½ yd. Minkee, off-white for foreground, Cut a piece 13” square.(Make sure the nap runs in the same direction as the base fabric.)
1 Fat Quarter of accent fabric:
- Cut a piece 8” wide x 10” tall from this for the heart and head of the owl
- Cut two 5-1/2” squares to make the Yo-Yo eyes
Pellon #805 Wonder-Under:
- Cut a piece 8” wide x 10” tall.Fuse this to the wrong side of the accent fabric following the manufacturer’s directions.Cool and then remove the paper backing.
Hobbs 80/20 Batting: Cut a piece 18” square
Yarn to coordinate with accent fabric to couch around owl
Black wool felt, cut two 1-3/8” discs (Hint: Trace circle on the dull side of Freezer Paper and then press to felt with a hot iron.Cut on the traced line.Save Freezer Paper to use over and over again.)
White wool felt, cut two 1-5/8” discs
Your favorite quilting thread to match fabrics (I used Glide)
Black embroidery floss (Use 2 strands)
Clover Extra Large Yo-Yo Maker (Makes a 2-3/8” Yo-Yo)
2 Brown Animal Button Eyes with locking backs
Fabrico Marker (This is Tsukineko ink, which will not change the hand of the fabric.I used brown.)
14” Pillow Form
Use 14 SPI and slow the speed down to 8.Use the spoon foot while quilting the Minkee.
Instructions:
1. Load backing fabric and batting. Center the background Minkee on top and baste the perimeter.
2. Center the off-white Minkee on top of the gray and baste it in place.
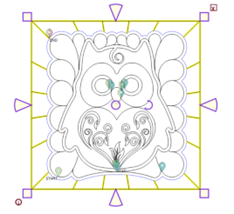
3. Center a 14” geometric square on the fabric and toggle it sewn. (Do not enlarge to 14.5”. You want the pillow to be snug and plump.)
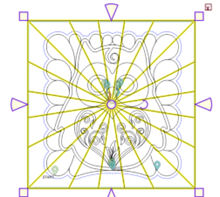
4. Select Cutie Owl Panto. Use nodes to divide out one owl. Change size it to Width: 11.12, Height 11.99
5. Center it in the square. Use nodes again to divide out the heart and the head of the owl. Toggle these sewn.
6. Quilt the feathers and the outline of the owl. (I matched the thread to the fabric.)
7. Echo the outline ¼” on the outside. Stitch again over the previous line of stitching. (I did this because I did not apply a fusible to the Minkee.)
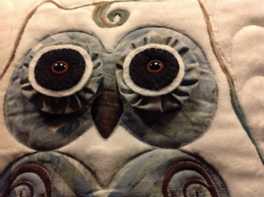
8. Center the accent fabric on the owl. Pin in the corners to keep it from shifting.
9. Change thread, if necessary. Toggle the heart, head, beak and eyes unsewn.Quilt. (I changed the eyes slightly.)
10. Use Appliqué scissors to carefully trim away the excess accent fabric
11. Then, trim away the excess off-white Minkee
12. Change to the couching foot to apply the yarn to the original outline of the owl. (Go back and divide the outline and toggle it unsewn. I divided the pattern so I started the yarn just above the curlicue. I followed the curlicue, came back up, went to the left and ended it where it started.) If necessary, quilt this line again to secure the yarn. (I did this.)
13. Now, quilt the background.Select the 14” square and convert it to a boundary. Select the echo line of quilting and convert it to a boundary.
14. Drag the trim background pattern on top of the owl and stretch to extend just past the boundary. Click on fill inside. Quilt.
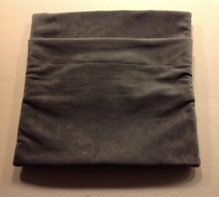
15. Color the beak and the curlicues on the heart with a Fabrico marker. (Plan where you’re going to end your coloring at the bottom.)
16. Construct pillow back. Serge the bottom of the top 15” x 9” piece of Minkee, along the bottom 15” side. (Double check that the nap runs up.) Turn under ¼” and stitch with your domestic machine.
17. Serge the top of the bottom piece 15” x 14” of Minkee, along the top 15” side.Fold a 2-1/4” hem and stitch close to the serging.
18. Lay the top of the pillow back down with the right side up. (The hem should be at the bottom)
19. Lay an acrylic ruler on top of the piece so 4-1/4” of the top is under the ruler.
20. Lay the bottom of the pillow back down on top of the other piece with the right side facing up. Line up the fold with the bottom edge of the ruler. Pin the sides where the fabrics overlap and baste them in place with your domestic machine.
21. Turn the backing unit wrong side up and center on top of the owl. (The hem should run horizontal.) Pin, to hold in place.
22. The sides of this unit are pretty thick to stitch; so I selected “Draw-Line” and drew individual lines just inside the stitching line for the perimeter of the trim background to stitch the back in place.
23. Use “Draw-Line” to stitch the vertical sides first. Slow the speed down so the fabric doesn’t shift and stitch at 12 SPI.
24. Now, use “Draw-Line” to stitch both the bottom and the top of the back in place. Make sure the line is just inside the stitching for the trim background. Again, slow the speed down so the fabric doesn’t shift and stitch at 12 SPI.
25. Unpin the pillow cover and trim seam allowances to ¼”.Fold corners to produce nice, sharp points.
26. Turn right side out.
27. Eyes: Follow the Clover directions to make the Yo-Yos.(Circles are 4-3/4” in diameter, if you don’t have a Yo-Yo maker.)
28. Cut discs out of white and black felt. Layer a black disc on top of a white one. Use 2 strands of black embroidery floss and a blanket stitch to sew the discs together. Make the second set.
29. Poke a tiny hole in the center of the discs. Put the stem of the animal eye button through the hole.
30. Center this unit on top of a Yo-Yo. Cut a tiny hole in the back. Push the stem through the Yo-Yo and secure with the locking piece.
31. Pin the Yo-Yos in place from the inside of the pillow to hold the eyes in place as you hand sew them.
32. Cover the pillow with a pressing cloth and carefully press the accent fabric with an iron on the Wool setting to fuse the accent fabric to the Minkee and to set the Fabrico ink.
33. Trim Background Frame. Insert the pillow form.
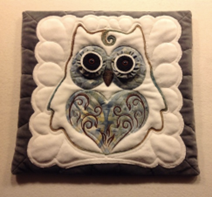
Enjoy your Snuggly, Cutie Owl Pillow!
If you have questions or comments, please contact me at olga_schrichte@msn.com