
Quilt From Robin Hrabik's Studio - A Rose Is A Rose
Posted by Robin Hrabik on 18th Oct 2015
This picture was sent to us by Robin Hrabik, Candy Apple Quilts, and she agreed to share her wonderful thoughts and process with us! Her thoughts are below:
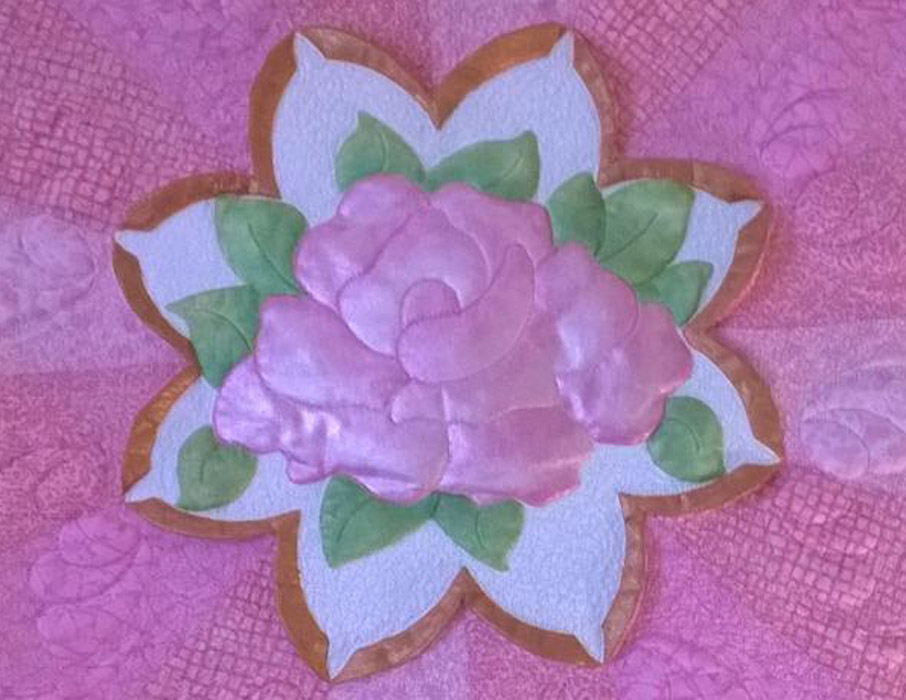
Inspiration struck the minute I saw your design. I love roses, and this is one of the prettiest ones I have seen. This pattern has so many possibilities! I could see it as an edge to edge (the way it was designed), and I could see the roses as a motif in pretty white blocks done with a pale pink thread. I also started dreaming of a whole cloth, and ways to add a touch of color to the beautiful design. That's when the idea of painting it occurred to me.
I stitched out a sample at 12 inches high on a quilt sandwich. Perfect. I love the way the frame completes the design. I sat down with my acrylic paints, a bit of water, and some shaving cream. The shaving cream is wonderful for mixing with paint in a cup to thicken it just a bit. That helps keep the paint from bleeding outside of the lines. I mixed three containers of paint: one in pink, one in green, and one in bronze. Using three brushes (so I wouldn't have to rinse in between colors), I painted a base coat on each area.
For the pink section, I used the color as it came out of the bottle (mixed with shaving cream), and then kept adding a little white paint to make the pink softer and lighter. As I added each thin layer of paint, I blended with the previous areas to achieve a shaded appearance. When the pink portion looked the way I wanted it to, I I used a new cup to mix white paint with a little water. Staying away from the edges, I added this thin color wash to the entire pink rose.
I used the same technique for the leaves, but instead f adding white to my dark green, I added light green to the shaving cream mixture to lighten it up. When the leaves looked the way I wanted them to, I used a new container with the palest shade of green and just a tiny bit of water. Again, staying away from the edges, I added a wash to the leaves.
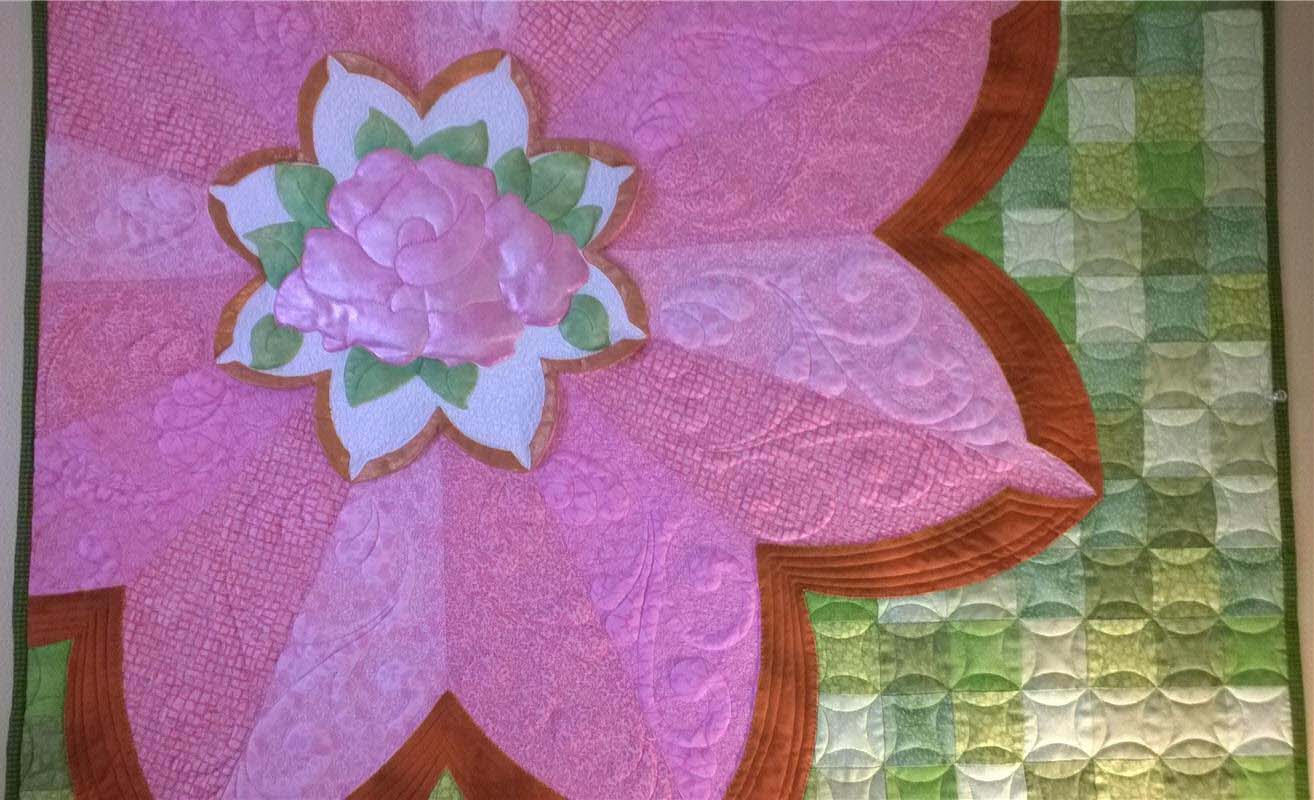
The bronze frame was the easiest part since it is all one color. When it was done, I used a new cup and mixed metallic gold with water for a wash. Now my sample was complete, but what to do with it? I knew I wanted a wall hanging that would be approximately 40 inches square for hanging over my desk. I wanted to duplicate the look of the bronze border because I really like the way it is shaped.
I cut pieces of freezer paper and taped them together to make my 40 inch square. That way, I had something to draw on. I placed my newly painted rose sample toward the upper left side. It looked a bit lonely there, and as I said, I wanted to duplicate the bronze border. But.... how to do that? I enlarged the rose pattern by 54%, and then used just the one section that I wanted as a pattern. Using a freezer paper applique technique, I cut out my bronze pieces and laid them on my master pattern. This left me with quite a bit of open area.
It was easy to draw straight lines from the smaller bronze frame out to the larger intersections, and I knew that I wanted different shades of pink fabric for each of the blades. Since I was already working on freezer paper, I knew I would be able to cut up my master pattern and use those pieces for cutting the pink sections. For the green outer section, I pieced together 2 inch squares cut from 2 1/2 inch strips in different shades of green to match the leaves. I only pieced a section that was large enough to cover the open space on the pattern.
I cut my pink sections with the patterns from the freezer paper master pattern, and sewed them together. Then I put them on top of the green section and added the completed bronze pieces. Using a machine blanket stitch, I sewed the bronze pieces in place and trimmed away anything on the back that didn't need to be there. Time to head to the quilt machine.
Using a Gammill machine with a Statler Stitcher, I chose the design that I wanted for each pink blade. I had to modify a design that I owner so that it would fit into the area. After the design was sewn in each pink section I micro-stippled around each design. I then used a white thread and micro-stippled around the open white area in the original rose section. The green squares stitched quickly with a point to point curve. I added the binding while the quilt was still on the machine, and finished it by hand when I was done.
I'm still pondering a couple of thoughts with this project. It would be easy to "open" the rose from the back and add a little stuffing to it to make it stand out more. Also, I'm thinking that some crystals may look nice in the larger bronze sections. It's funny how our quilts go through the blooming process, isn't it?
My web site is undergoing some changes right now, so I won't be able to publish any of the close-up pictures for a few weeks, but stand by for more information on the process. For more pictures that are available now, you can see the album titled Painted Pink Rose on my Facebook page: https://www.facebook.com/CandyAppleQuilts?ref=hl and I hope you will "like" it while you are there! My current web site is https://www.facebook.com/CandyAppleQuilts?ref=hl
Happy quilting to all, and may your bobbins never be empty!
Robin Hrabik
Candy Apple Quilts